Wednesday, December 15, 2010

Works Cited

Colvin, AC. (2009, Octiber 27). Music synchronized led pumpkin.

Retrieved from http://www.instructables.com/id/Music-Synchronized-LED-Pumpkin/


Harris, T. (2002, January 31). How light emitting diodes work.

Retrieved from http://electronics.howstuffworks.com/led.htm


Elemental LED, Initials. (2010, November 8). The global impact of your lighting.

Retrieved from http://www.elementalled.com/leducation/blog/green-eco-friendly/incandescents-vs-cfl-vs-led-lighting/

Impact on Society

This project will have a positive impact on society, as it demonstrates the power of LED technology. LED technology is incredibly energy efficient, and the bulbs last for more than 10000 hours. This means that you will not have to throw out the lights for a long time, reducing the amount of waste in our landfills. Also, most LEDs contain no hazardous materials, unlike CFL lights which contain mercury. This means that when you do have to throw them out, they will not pollute the environment. There really are no potentially negative aspects of this technology. It really is the future of lights in our society.

Purpose

The purpose of this project was to create a unique decoration for my room. Instead of just making a traffic light that is on all of the time, I decided to add my own twist. For quite a while I have been experimenting with LEDs and syncing them to music. I started last Halloween when I made my pumpkin flash to music (see my instructable here). This project is an extension of the pumpkin, as I used the same software and a modified controller. I think that the effect turned out great, and I can't wait to put it in my room.

Tuesday, December 14, 2010

Final Assembly

I finally finished the traffic light!  Once my paint had dried, I needed to figure out a way to make the lights have color when they were off but light up from the LEDs.  I had originally thought about using theatrical lighting gels but they were too dark and ate up too much of my light.  So I decided to have a light pattern printed in red, green and yellow at Staples on overhead transparencies.  It looked great and only cost $6.
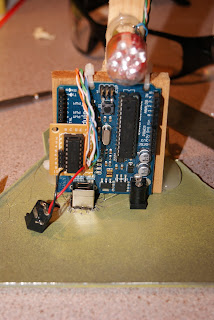
Next, I had to mount the LEDs inside the light.  To do this, I attached them to a long, skinny piece of wood and hung it from the removable top.  The wood is attached to the top using a screw and some glue. I made a wooden bracket to hold the electronics inside the light and cut holes for the ports in the top.


With all of the electronics assembled, all that was left to do was to put it all together and test it. When I tested it for the first time I found that the green light leaked into all of the other colors, which reduced the effect.  This was easily fixed by making a cardboard divider.  In the end, it all worked fine.  I am very impressed at how well it turned out.

Works Cited: 
"How Light Emitting Diodes Work"-How Stuff Works
         -from "http://electronics.howstuffworks.com/led.htm" , accessed 14/12/2010

Light Construction


Yesterday, I got lots of work done on the physical light.  I fabricated the light using sheet metal in the auto body shop in my school.  I started by downloading a 3d model of a traffic light and scaling it to about 1:2 using the popular Google Sketchup.  I traced the measurements onto a Bristol board template.  Unfortunately, I no longer have these templates and files as I did this sometime last year.  I traced the Bristol board template onto sheets of steel.  I bent the pieces using a brake and spot welded them together.  Next, I spot welded each of the three lights together and MIG welded some caps onto the openings that I did not want to be seen. 

I primed it in the school's spray booth, then waited 15 minutes while the spray booth baked the primer at 150 degrees Fahrenheit.  Once the primer was dry, I gave it about 3 coats of yellow Tremclad paint.  This gave it a great finish.  I left it to dry overnight and was then ready to install the electronics.

Traffic Light Controller

Tonight I made a lot of progress on the controller for the traffic lights. As mentioned in my previous post, I am going to use a simple ULN2003 to drive the LEDs. I chose this chip mostly because it was what I had on hand but also because it is very easy to use and requires no external components. Below is the circuit diagram.

The setup...
and the finished circuit board.

For the lights, I am using 12 volt LED tail lights that I got at Princess Auto for $2.99 each. I got one red light and two orange lights, thinking that it would be easy to put a green lighting gel in front of one of the orange lights to make it green. In the end, this idea did not work so, I had to make my own. I simply soldered 9 LEDs together and added a 100 ohm resistor to regulate the current. This worked great and was what I used in the final light.
The Final Controller in Action.


My green LED.

Led Controller Update

Tonight I got some work done on the electronics side of things.  I am going to use an Arduino to control the lights.  An Arduino is a programmable microcontroller that can be controlled with a computer.  I have managed to get it to flash three single LEDs to the beat of music.

For the software, I am going to use the popular "Processing" language.  Basically, the software analyzed the output of the internal mic, detects the beats and signals individual LEDs connected to the Arduino.

The Test Setup
I am also starting to develop the controller for the final setup.  I am going to use LED car tail-lights for my lights and I am going to use a ULN2003 driver chip to switch the LEDs on and off.

Thursday, December 9, 2010

A Breif Theory Behind LEDs

An LED (Light Emitting Diode) is an incredibly versatile light source that is found in many objects that we use daily.  In short, an LED is just a small light bulb that fits into an electric circuit, much like an incandescent bulb.  However, unlike their incandescent counterparts, LEDs have no filament, generate little to no heat and use a fraction of the energy that an incandescent bulb uses. LEDs are illuminated by the movement of electrons through a semiconductor material.  A semiconductor is a material with a varying degree of conductivity.  Most semiconductors are made of a material that has poor conductivity and has impurities added to it.  Almost every electronic device, from computers to traffic lights, has semiconductors in it.